Welcome
Since its release in 2014, Kubernetes has become the de facto standard for container orchestration. The software platform is now the foundation for a new generation of cloud native applications – those architected with ephemeral cloud infrastructure in mind. How to save cloud costs when running Kubernetes on Azure? There is no silver bullet, but this blog post describes a few tools to help you manage resources and see how it could cut your bill by up to 40% while trading in best performance and full reliability.
In this article, we will explore the different approaches to save cloud costs with Kubernetes on Azure but it will apply in (nearly) exactly the same way for other cloud providers.
Assumptions and Prerequisites
- Basic hands-on experience with Kubernetes.
- Up and Running Azure AKS Kubernetes Cluster.
- You have kubectl installed in your local machine.
- You have Azure CLI installed.
- Preferably you have Terraform installed in your local machine
- Running the Azure CLI version 2.0.76 or later. Run
az --versionto find the version. If you need to install or upgrade, see Install Azure CLI.
How to save cloud costs with Kubernetes on Azure ?
To answer this question, we’ll cover the following techniques and tools in this article:
- ✅ Enable and use the cluster autoscaler in an AKS cluster
- ✅ Scale down your cluster(s) during non-work hours
- ✅ Use Spot instances
- ✅ How to horizontally autoscale your K8S deployments (HPA)
- ✅ Clean up unused resources on your cluster
- ✅ Optimise your Kubernetes resource allocation
Before starting
To create an Azure AKS cluster, preferably you use an Infrastructure as Code tool like Terraform. Although cluster creation isn’t covered by this lab, however you can follow my IaC lab to deploy AKS with Terraform.

Enable and use the cluster autoscaler in an AKS cluster
To keep up with application demands in Azure Kubernetes Service (AKS), you may need to adjust the number of nodes that run your workloads. The cluster autoscaler component can watch for pods in your cluster that can’t be scheduled because of resource constraints. When issues are detected, the number of nodes in a node pool is increased to meet the application demand. Nodes are also regularly checked for a lack of running pods, with the number of nodes then decreased as needed. This ability to automatically scale up or down the number of nodes in your AKS cluster lets you run an efficient, cost-effective cluster.
Update an existing AKS cluster to enable the cluster autoscaler
Use the az aks update command to enable and configure the cluster autoscaler on the node pool for the existing cluster. Use the --enable-cluster-autoscaler parameter, and specify a node --min-count and --max-count.
Important:
The cluster autoscaler is a Kubernetes component. Although the AKS cluster uses a virtual machine scale set for the nodes, don’t manually enable or edit settings for scale set autoscale in the Azure portal or using the Azure CLI. Let the Kubernetes cluster autoscaler manage the required scale settings. For more information, see Can I modify the AKS resources in the node resource group?
The following example updates an existing AKS cluster to enable the cluster autoscaler on the node pool for the cluster and sets a minimum of 1 and maximum of 3 nodes:Azure CLICopyTry It
az aks update \
  --resource-group <yourResourceGroup> \
  --name <yourAKSCluster> \
  --enable-cluster-autoscaler \
  --min-count 1 \
  --max-count 10
It takes a few minutes to update the cluster and configure the cluster autoscaler settings.
Scale down your cluster during non-work hours
Kubernetes Downscaler tool (kube-downscaler) allows users and operators to scale down systems during off-hours. To save Cloud costs with Kubernetes on Azure you need to combine the downscaler with the AKS cluster autoscaler.
Kubernetes deployments and StatefulSets can be scaled to zero replicas. CronJobs can be suspended. Kubernetes Downscaler is configured for the whole cluster, one or more namespaces, or individual resources. Either “downtime” or its inverse, “uptime”, can be set.
The following showing you my AKS cluster’s nodes -only 1 node- before I deploy anything on it:
|--⫸  kubectl get nodes NAME
                                   STATUS   ROLES   AGE   VERSION
 aks-default-17028763-vmss000000   Ready    agent   9d    v1.19.3
Now let’s deploy the Online Boutique micro-services demo application on AKS and watch the behaviour of the cluster
git clone https://github.com/GoogleCloudPlatform/microservices-demo.git
cd microservices-demo
kubectl apply -f ./release/kubernetes-manifests.yaml
In order to handle the new traffic, we will see that the cluster will scale up itself in few minutes
|--⫸  kubectl get nodes
 NAME                              STATUS   ROLES   AGE     VERSION
 aks-default-17028763-vmss000000   Ready    agent   9d      v1.19.3
 aks-default-17028763-vmss000002   Ready    agent   2m29s   v1.19.3
And now we can check the status of our application deployment:
|--⫸  kubectl get pods
 NAME                                     READY   STATUS    RESTARTS   AGE
 adservice-5f6f7c76f5-25vzj               1/1     Running   0          8m1s
 cartservice-675b6659c8-jhgrq             1/1     Running   5          8m2s
 checkoutservice-85d4b74f95-6wg28         1/1     Running   0          8m3s
 currencyservice-6d7f8fc9fc-dtjq9         1/1     Running   0          8m2s
 emailservice-798f4f5575-ptpjm            1/1     Running   0          8m3s
 frontend-6b64dc9665-9vstg                1/1     Running   0          8m2s
 loadgenerator-7747b67b5-gcwlm            1/1     Running   6          8m2s
 paymentservice-98cb47fff-b9qxf           1/1     Running   0          8m2s
 productcatalogservice-7f857c47f-6kdmh    1/1     Running   0          8m2s
 recommendationservice-5bf5bcbbdf-6mfpd   1/1     Running   0          8m2s
 redis-cart-74594bd569-clrf9              1/1     Running   0          8m1s
 shippingservice-75f7f9dc6c-c5vmc         1/1     Running   0          8m1s
In the direction of demonstrating the power of the cluster autoscaler and kube-downscaler combined, w’ll start by deploying and configuring the kube-downscaler operator in our cluster, in fact, this guy will shrink the application deployment immediately – as it’s a non-working hour at the moment of writing this article 😉 –
https://codeberg.org/hjacobs/kube-downscaler.git
cd kube-downscaler
Then, we will edit the configuration file: deploy/deployment.yaml as the following:
image: hjacobs/kube-downscaler:20.10.0
        args:
          # dry run by default, remove to perform downscaling
          # - --dry-run
          # run every minute
          - --interval=30
          - --exclude-namespaces=kube-system
          - --exclude-deployments=kube-downscaler
          - --default-uptime=Mon-Fri 08:00-20:00 Europe/Berlin
          - --include-resources=deployments,statefulsets,stacks,cronjobs
          - --deployment-time-annotation=deployment-time
Now we rae ready to run our operator:
kubectl apply -f deploy/ As expected, the Kube Downscaler scale down everything we deployed during the shift to 0 except the downscaler pod itself 😃
|--⫸  kubectl get pods
 NAME                               READY   STATUS    RESTARTS   AGE
 kube-downscaler-77cffd57fb-xjkpc   1/1     Running   0          168m
Moreover, we can see that there is only one node left in our cluster, thanks to the magic magic of the AKS Cluster autoscaler 🙈
|--⫸  kubectl get nodes
 NAME                              STATUS   ROLES   AGE   VERSION
 aks-default-17028763-vmss000000   Ready    agent   9d    v1.19.3
In production, this tool helped us to scale down from ~13 to 3 worker nodes and this certainly makes a difference on the our Azure bill.
Add a spot node pool to an AKS cluster
Next practice, Azure AKS costs can be reduced by using Spot instances as Kubernetes worker nodes. Spot Instances are available at up to a 90% discount compared to On-Demand prices.
A spot node pool is a node pool backed by a spot virtual machine scale set. Using spot VMs for nodes with your AKS cluster allows you to take advantage of unutilized capacity in Azure at a significant cost savings.
Important 1: When deploying a spot node pool, Azure will allocate the spot nodes if there’s capacity available. But there’s no SLA for the spot nodes. A spot scale set that backs the spot node pool is deployed in a single fault domain and offers no high availability guarantees. At any time when Azure needs the capacity back, the Azure infrastructure will evict spot nodes.
Important 2: Spot nodes are great for workloads that can handle interruptions, early terminations, or evictions. For example, workloads such as batch processing jobs, development and testing environments, and large compute workloads may be good candidates to be scheduled on a spot node pool.
In this article, we will add a secondary spot node pool to an existing Azure Kubernetes Service (AKS) cluster.
Create a node pool using the az aks nodepool add:
az aks nodepool add \
--resource-group <yourResourceGroup> \
--cluster-name <yourAKSCluster> \
--name spotnodepool \
--priority Spot \
--eviction-policy Delete \
--spot-max-price -1 \
--min-count 1 \
--max-count 10 \
--no-wait
By default, you create a node pool with a priority of Regular in your AKS cluster when you create a cluster with multiple node pools. The above command adds an auxiliary node pool to an existing AKS cluster with a priority of Spot. The priority of Spot makes the node pool a spot node pool. The eviction-policy parameter is set to Delete in the above example, which is the default value. When you set the eviction policy to Delete, nodes in the underlying scale set of the node pool are deleted when they’re evicted. You can also set the eviction policy to Deallocate. When you set the eviction policy to Deallocate, nodes in the underlying scale set are set to the stopped-deallocated state upon eviction. Nodes in the stopped-deallocated state count against your compute quota and can cause issues with cluster scaling or upgrading. The priority and eviction-policy values can only be set during node pool creation. Those values can’t be updated later.
Verify the spot node pool
To verify your node pool has been added as a spot node pool:Azure CLICopy
az aks nodepool show --resource-group <yourResourceGroup> --cluster-name <yourAKSCluster> --name spotnodepool
Confirm scaleSetPriority is Spot.
To schedule a pod to run on a spot node, add a toleration that corresponds to the taint applied to your spot node. The following example shows a portion of a yaml file that defines a toleration that corresponds to a kubernetes.azure.com/scalesetpriority=spot:NoSchedule taint used in the previous step.YAMLCopy
spec:
  containers:
  - name: spot-example
  tolerations:
  - key: "kubernetes.azure.com/scalesetpriority"
    operator: "Equal"
    value: "spot"
    effect: "NoSchedule"
   ...
When a pod with this toleration is deployed, Kubernetes can successfully schedule the pod on the nodes with the taint applied.
Max price for a spot pool
Pricing for spot instances is variable, based on region and SKU. For more information, see pricing for Linux and Windows.
With variable pricing, you have option to set a max price, in US dollars (USD), using up to 5 decimal places. For example, the value 0.98765 would be a max price of $0.98765 USD per hour. If you set the max price to -1, the instance won’t be evicted based on price. The price for the instance will be the current price for Spot or the price for a standard instance, whichever is less, as long as there is capacity and quota available.
Limitations
The following limitations apply when you create and manage AKS clusters with a spot node pool:
- A spot node pool can’t be the cluster’s default node pool. A spot node pool can only be used for a secondary pool.
- You can’t upgrade a spot node pool since spot node pools can’t guarantee cordon and drain. You must replace your existing spot node pool with a new one to do operations such as upgrading the Kubernetes version. To replace a spot node pool, create a new spot node pool with a different version of Kubernetes, wait until its status is Ready, then remove the old node pool.
- The control plane and node pools cannot be upgraded at the same time. You must upgrade them separately or remove the spot node pool to upgrade the control plane and remaining node pools at the same time.
- A spot node pool must use Virtual Machine Scale Sets.
- You cannot change ScaleSetPriority or SpotMaxPrice after creation.
- When setting SpotMaxPrice, the value must be -1 or a positive value with up to five decimal places.
- A spot node pool will have the label kubernetes.azure.com/scalesetpriority:spot, the taint kubernetes.azure.com/scalesetpriority=spot:NoSchedule, and system pods will have anti-affinity.
- You must add a corresponding toleration to schedule workloads on a spot node pool.
Clean up unused resources
Working in a fast-paced environment is great. We want tech organizations to accelerate. Faster software delivery also means more PR deployments, preview environments, prototypes, and spike solutions. All deployed on Kubernetes. Who has time to clean up test deployments manually? It’s easy to forget about deleting last week’s experiment. The cloud bill will eventually grow because of things we forget to shut down
Kubernetes Janitor (kube-janitor) helps to clean up your cluster. The janitor configuration is flexible for both global and local usage:
- Generic cluster-wide rules can dictate a maximum time-to-live (TTL) for PR/test deployments.
- Individual resources can be annotated with janitor/ttl, e.g. to automatically delete a spike/prototype after 7 days.
Generic rules are defined in a YAML file. Its path is passed via the –rules-file option to kube-janitor. Here an example rule to delete all namespaces with -pr- in their name after two days:
- id: cleanup-resources-from-pull-requests
resources:
     - namespaces
jmespath: "contains(metadata.name, '-pr-')"
ttl: 2d
To require the application label on Deployment and StatefulSet Pods for all new Deployments/StatefulSet in 2020, but still allow running tests without this label for a week:
- id: require-application-label
# remove deployments and statefulsets without a label "application"
resources:
- deployments     - statefulsets   # see http://jmespath.org/specification.html
jmespath: "!(spec.template.metadata.labels.application) && metadata.creationTimestamp > '2020-01-01'"
ttl: 7d
To run a time-limited demo for 30 minutes in a cluster where kube-janitor is running:
kubectl run nginx-demo --image=nginx
kubectl annotate deploy nginx-demo janitor/ttl=30m
Another source of growing costs are persistent volumes (Azure ABS). Deleting a Kubernetes StatefulSet will not delete its persistent volumes (PVCs). Unused ABS volumes can easily cause costs of hundreds of dollars per month. Kubernetes Janitor has a feature to clean up unused PVCs. For example, this rule will delete all PVCs which are not mounted by a Pod and not referenced by a StatefulSet or CronJob:
# delete all PVCs which are not mounted and not referenced by StatefulSets
- id: remove-unused-pvcs
resources:
- persistentvolumeclaims
jmespath: "_context.pvc_is_not_mounted && _context.pvc_is_not_referenced"
ttl: 24h
Kubernetes Janitor can help you keep your cluster “clean” and prevent slowly growing cloud costs. See the kube-janitor README for instructions on how to deploy and configure.
Optimise your Kubernetes resource allocation
Kubernetes workloads specify their CPU/memory needs via “resource requests”. CPU resources are measured in virtual cores or more commonly in “millicores”, e.g. 500m denoting 50% of a vCPU. Memory resources are measured in Bytes and the usual suffixes can be used, e.g. 500Mi denoting 500 Mebibyte. Resource requests “block” capacity on worker nodes, i.e. a Pod with 1000m CPU requests on a node with 4 vCPUs will leave only 3 vCPUs available for other Pods.
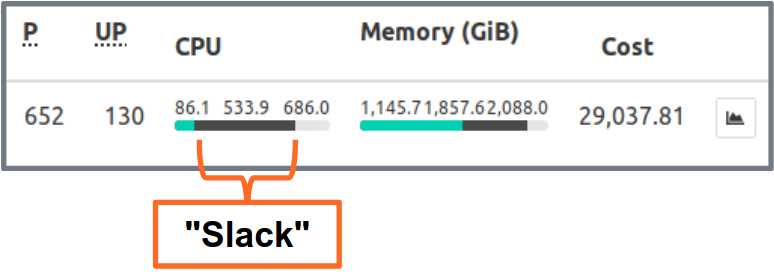
Slack is the difference between the requested resources and the real usage. For example, a Pod which requests 2 GiB of memory, but only uses 200 MiB, has ~1.8 GiB of memory “slack”. Slack costs money. We can roughly say that 1 GiB of memory slack costs ~$10/month.
Kubernetes Resource Report (kube-resource-report) displays slack and can help you identify saving potential:

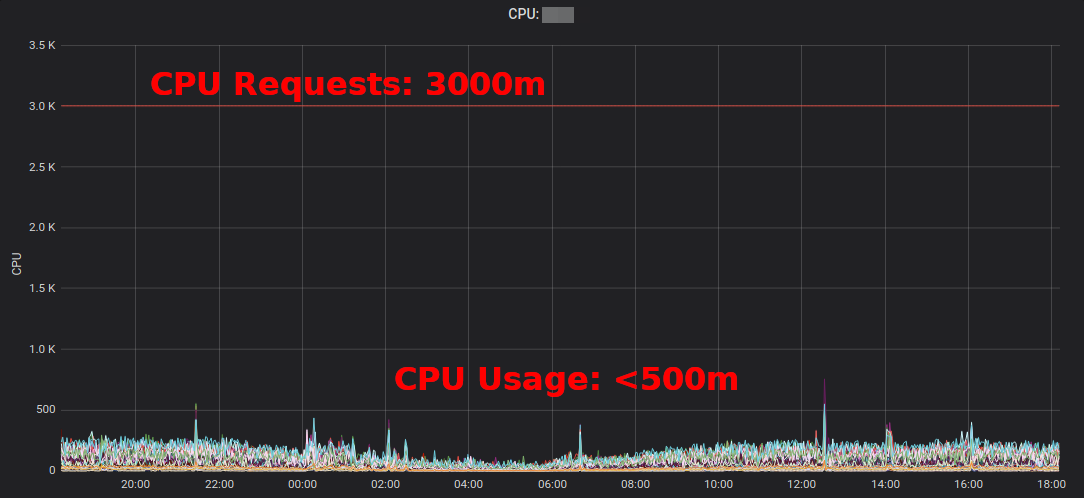
Kubernetes Resource Report shows slack aggregated by application and team. This allows finding opportunities where resource requests can be lowered. The generated HTML report only provides a snapshot of resource usage. You need to look at CPU/memory usage over time to set the right resource requests. Here a Grafana chart of a “typical” service with a lot of CPU slack: all Pods stay well below the 3 requested CPU cores:

Reducing the CPU requests from 3000m to ~400m frees up resources for other workloads and allows the cluster to scale down.
“The average CPU utilization of EC2 instances often hovers in the range of single-digit percentages” writes Corey Quinn. While EC2 Right Sizing might be wrong, changing some Kubernetes resource requests in a YAML file is easy to do and can yield huge savings.
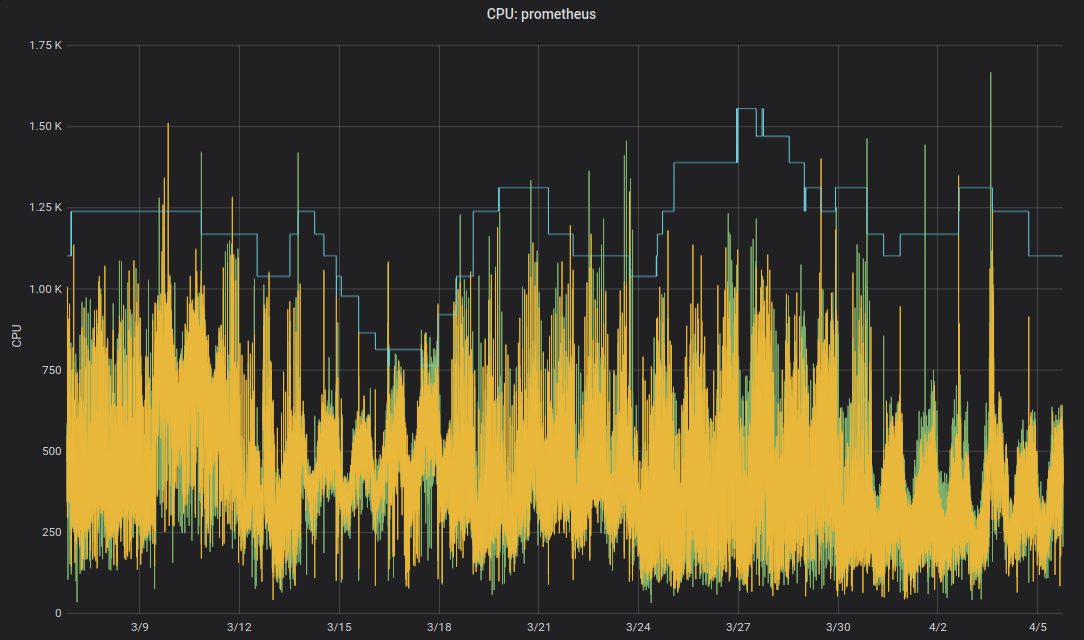
But do we really want humans to change numbers in YAML files? No, machines can do this better! The Kubernetes Vertical Pod Autoscaler (VPA) does exactly this: adapt resource requests and limits to match the workload. Here some example graph of Prometheus’ CPU requests (thin blue line) adapted by VPA over time:

Zalando uses the VPA in all its clusters for infrastructure components. Non-critical applications can also use VPA.
Fairwind’s Goldilocks is a tool creating a VPA for each deployment in a namespace and then shows the VPA recommendation on its dashboard. This can help developers set the right CPU/memory requests for their application(s):

Use horizontal autoscaling
Last, but not least, will introduce the HPA to save cloud costs with Kubernetes on Azure. Many applications/services deal with a dynamic load pattern: sometimes their Pods idle and sometimes they are at their capacity. Running always with a fleet of Pods to handle the maximum peak load is not cost efficient. Kubernetes supports horizontal autoscaling via the HorizontalPodAutoscaler (HPA) resource. CPU usage is often a good metric to scale on:
apiVersion: autoscaling/v2beta2
kind: HorizontalPodAutoscaler
metadata:
  name: my-app
spec:
  scaleTargetRef:
    apiVersion: apps/v1
    kind: Deployment
    name: my-app
  minReplicas: 3
  maxReplicas: 10
  metrics:
  - type: Resource
    resource:
    name: cpu
    target:
      averageUtilization: 100
      type: Utilization
Configuring horizontal autoscaling with HPA should be one of the default actions to increase efficiency for stateless services. Spotify has a presentation with their learnings and recommendations for HPA: Scale Your Deployments, Not Your Wallet.
That’s all folks!
That’s all for this lab, thanks for reading 🙏
I hope you find some of the presented tools useful to reduce your cloud bill.